Microlight Solo ~ Two weeks and change on the ground ~ Final Impressions
Quick summary
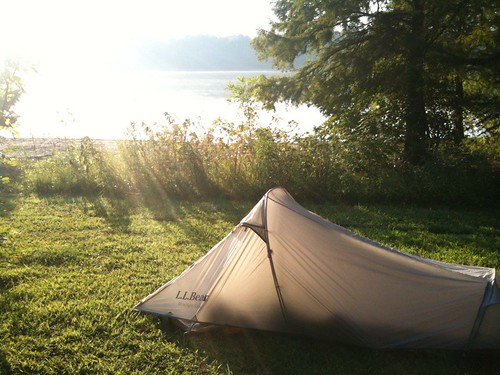
I set this tent up and took it down every day for over two weeks and thought it was excellent.
The details
I figured that camping was “the way to do it”. I’d save money, and remain a bit more in contact with the world than if i’d of stayed in motels on my trip, so I need a tent.
I hoped on my bike and drove about a hundred and fifty miles up to the L.L. Bean store in Maine. Sure I could have hopped on the subway and gone to the local R.E.I., but hey L.L. Bean’s been at this a lot longer, has a much cooler place to visit, and… road trip! And, to be fully up front. I’d read some good reviews of the L.L. Bean Microlight Solo on their site and just wanted to see one in person.
When I finally made my way to the tent section I encountered an incredibly helpful salesman, whose name I’ve totally forgotten (sorry), who confirmed my thoughts on it discussed a few of other tent options, and suggested that I get the $15 “Footprint” to go with it, but made it clear that it wasn’t a requirement, but that I’d probably want to put down a plastic bag or something under the tent if I didn’t have it to keep it from being damaged by the scratchy rocks and sticks and such I’d be compressing under myself, and to act as a moisture barrier. I think it was worth every penny. But first, the tent itself.
This is, unquestionably, a one-man tent. As in, one person who’s in shape. If you’re… “generously padded” this is NOT the tent for you. Two thin people could probably fit if they were willing to lay on their sides and spoon each other. Also, because of the shape you can only sit up just inside the doorway. I’m 5'9" and I didn’t have any problems with this, although I did occasionally brush my head when placing or removing anything from down by my feet, or if I sat up in my sleeping bag I’d have to scoot back towards the entrance.
This small size is actually one of the reasons I chose the tent. Small size means less material, a smaller bag, and less weight; all things which are critical on a motorcycle trip. When I first got it home I attempted to set it up in my living room just to get a feel for it, but having not set up a tent in well over fifteen years I was rather surprised at how dramatically tent-tech has changed. First off, it’s not a free-standing tent. It simply won’t stay erected if you don’t pound in the tent-pegs. This isn’t a bad thing for most of North America, it just means no living room test-runs, sand and snow would probably be quite difficult without specialized tent pegs, and you definitely can’t set it up on a large flat rock. You’ll need soil. There are two poles, which are made from tubes of aluminum with an elastic cord run through them to keep them together, and help them snap easily into place as you’re combining them into one long tube; an act that takes about five seconds. Unlike the tents of yesteryear you don’t bend them slightly to fit through some straps on the tent. No, you stick one end through a grommet in the tent, then bend it far beyond anything that seems sensible, until the other end finally approaches the grommet on the opposite side of the tent. Then, you do the same thing for the other pole. It’s not hard, it’s just a bit disturbing to someone who isn’t used to this new world order.
Then, you lift up one of the poles, pull a series of plastic hooks over it, pound in a peg or two, and repeat at the other end. I found the easiest way to do it was to erect one pole, push in one tent peg, then step on, or press far side of the tent down while you grab and lift the other pole. Once you’ve got the far one lifted pound in the diagonally opposite tent peg. Congratulations you’ve just done the bare minimum required to raise this tent. I wouldn’t recommend stopping there but it’s pretty impressive that with two tent pegs you’ve got your tent up. A little floppy at the unpegged corners but hey…. Then just move around the tent putting in the rest of the pegs. The footprint matches the base of the tent exactly, has its own grommets that the poles also go through, and some loops for the tent pegs to pass through directly under the ones for the tent.
Once you’ve done that you now have a mosquito netting tent up with a waterproof base and a full view of the world. If you’d like some privacy, or expect rain, throw the rain fly over it and shove in a couple pegs. The rain fly also creates a little alcove in front of the door under which you can set things you want out of sight, or protected from the rain, but don’t want in the main body of the tent. There is a gap between the netting and the rain fly and this is a very important feature. Your body heat is going to cause condensation to form on the inside of any tent (assuming there’s water in the air to condense) but in a tent like this it forms on the rain fly which won’t end up getting you or your gear wet because of the gap. It simply forms on and runs down the inside of the fly to the ground without ever touching you. Unfortunately the fly tended to sag slightly between the two poles so there was about eight square inches of space in the middle of the tent where they did make contact. This was never a problem even on the most dewey of mornings but it shouldn’t have been happening. Casually putting up the tent, while pausing to listen to the insects and look at pretty views still took less than 8 minutes from start to finish, including putting all my stuff in it after it was up.
The slight sag of the rain fly was most likely because of the one badly designed element of the tent. At the foot end of the rain fly are two pieces of webbing. Each has a loop at the end for a tent peg to go through and runs through a plastic length adjuster thing. The problem is that no matter how much you shortened the adjuster never held it. I ended up looping the webbing around the adjuster and that was almost the right length. While certain parts of the fly get their own tent pegs there were no pegs for these so you had to put the end loop over one of the pegs used for the base. This would have worked perfectly if the adjusters worked, but they didn’t so it didn’t pull with quite enough tension on the top and you end up with that little sag in the middle. So, if you do get this tent my recommendation would be to purchase two more of the thin aluminum tent pegs that this tent uses. Then you can just put them at the end of the webbing and pull it as taught as you need to.
Space and Comfort
I am 5'9" tall and about 145 lbs. I had enough space for me, my one piece riding suit down along my side, my Camelbak M.U.L.E NV on one side of my head, my walking shoes and assorted other small junk by the other side (flashlight, iPhone, a small tupperware of food, etc), a pillow (actually my pants and high-vis vest rolled up), my full-face motorcycle helmet to the left of my feet and my riding boots to the right of my feet. My glasses went in one of the two mesh pockets that are right by your hands when you lay down and seem designed for just such a usage. Those pockets were a perfect little touch. After taking my sleeping bag out of the dry-sack I’d stick it in the alcove (it had a book, notebooks, and an emergency set of dry clothes still in it) and have space on the other side of the alcove that I pretty much never used.
The comfort was fine. It was wide enough that you could curl into a fetal position without trouble and laying there in the morning watching the silhouettes of leaf shadows on the rain fly was nice. You didn’t feel cramped in there. However, I would note that owing to the fact you can only sit up by the doorway you really wouldn’t want to be stuck in there hiding from the rain all day. That wasn’t a concern for me since I ride rain or shine. Also, obviously, this tent is not for anyone who is claustrophobic.
Tear-Down tip
The rain fly is made of some incredibly slippery parachute fabric. When you roll it up it’s really difficult to get it to stay rolled up nicely as you’re trying to get it in the bag. It just wants to slide out of itself. The solution I found was to roll up the tent (mosquito netting and base) so that you have a rectangle slightly shorter than the bag and about half again as wide with the base out. do the same for the rain fly, then fold that in half again and stick it on top of the base. Then roll the base around the rain fly so that when you’re holding it with one hand there is only the base material exposed to your hand to grip.
For the Footprint: fold it into a rectangle as tall as the bag and whatever width, then roll.
Main points:
- Extremely light-weight and compact when packed up. I could easily roll it up smaller than the bag it lived in and there was plenty of space in there for the pegs, poles, and the footprint.
- So easy to put up you can do it in the dark. If you’re familiar with how all the pieces go together. I did it once in the pitch black since dealing with the flashlight too was distracting, and a couple times as I raced the last rays of sunlight.
- Enough space for you, some gear around your head, and some by your feet.
- Get the Footprint. It’s worth the $15 for the convenience of all its perfectly placed connectors, folds up very small and can fit in the tent bag.
- Buy two additional thin tent pegs to compensate for the bad adjusters on the rear of the rain fly.
Assorted notes
- I’ve taken the tent down in a strong wind. I was very surprised to find that it wasn’t a hassle at all. There’s simply not enough fabric for it to be a big deal.
- Owing to extenuating circumstances I never actually used it in the rain, but according to the reviews on the site it performs excellently. I would not doubt this in the least.
- There’s some velcro on the outside of the rain-fly along the zipper. I am not sold on this. I’m sure they put it there because of some wind issue but whatever their decision was it never became apparent to me and occasionally gave me a trivial amount of annoyance when dealing with the zipper. This is totally nit-picking I admit.
- The elastic cord through the tent pole sections really made them trivial to put together. You could almostgrab one end, wave it in the air and listen to the pieces snap snap snap into place… almost. In reality you can do it with your eyes closed, or better yet, while paying attention to the beautiful scenery you’ve found yourself in. Taking them apart is just as easy.