The Entrepreneur's Notebook (part 3)
Notebook choices, and backups
Part 3 of 3
See also:
What about backups and searchability?
This is one place where the digital age is unquestionably superior. Dropbox, iCloud, email… there are myriad ways to back up your digital writing, and text is easy to search. On the mac, Spotlight gives you great search across every document you’ve ever written and searching within a document is easy in any text editor. Paper… not so much.
Searchability
In practice though, searchability is not a big deal, especially if you’ve got a Table of Contents (see Part 2), but even without one, you’re just flipping through a notebook’s worth of pages, that are all clearly titled by project. Finding your notes on a given idea turns out to be fast and easy, and as I mentioned in Part 1, the process of flipping through pages helps to keep other ideas fresh, and connect things that wouldn’t otherwise be connected.
Backups
This, is a notable limitation. The best strategy I’ve found is to simply take a picture of it. If you’ve got a smartphone the quality should be plenty good to zoom in on your computer and read whatever’s there. If you don’t have a smartphone any digital camera should have decent enough resolution.
I should call out the Evernote Smart Notebook. “For the Evernote Smart Notebook by Moleskine, Evernote finds the dot pattern and even corrects the skew of the photo. This means that the images that end up in your account are perfect for Evernote’s handwriting recognition, so that you’ll be able to find you thoughts anytime. "
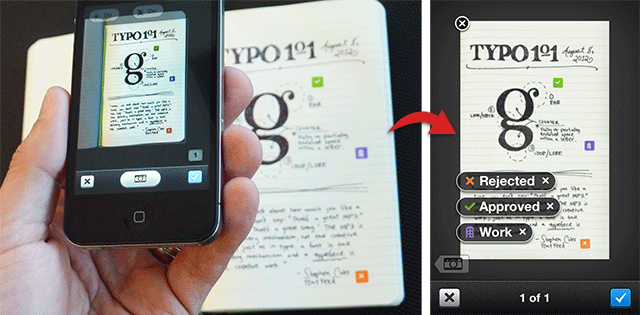
Having had personal experience with handwriting recognition I can say that it absolutely can work, if you have clean handwriting, but, if you’re scribbling down ideas as fast as they come to you, you’re handwriting is not going to be “clean”, and OCR software is terrible about dealing with the more visual note-taking styles. Imagine you wrote “bigger” in a bubble with an arrow pointing to a diagram? How is the software supposed to know where to put it in a text only version of your page? I wouldn’t even know where to put it. With that said, Evernote is probably the best tool currently available for backing up your notebook pages, and there are very few people trying to tackle this particular problem.
Scanning vs. Photographing
In general scanning a bound book is annoying. You can’t run the pages through an automated scanner, and on a flatbed scanner you have to press down consistently on the spine for the length of the scan or risk having a shadow over everything written close to the spine.
While scanning is always going to take longer, and be more annoying than simply photographing your notebook’s pages, it will always get you better results. But, you have to ask yourself if it really matters enough to bother. In my experience it doesn’t. I almost never reference scans, and if I did manage to loose a notebook I’d previously photographed or scanned I suspect that I’d just print out the relevant pictures and staple them into my current notebook, or just copy the info.
The Boundless Notebook mentioned below sidesteps the major scanning problems by letting you use standard 8 1/2” x 11" paper which you fold in half (approximately A5 size). When you’re done you can pull it out, flatten the fold, and put in in a scanner with an automatic feed, or do them one by one on a flatbed scanner, without having to hold down the spine and worrying about shadows. As a bonus, they’re easy to put back together when you’re done.
If having high quality backups is important to you, I can’t think of a better solution than the Boundless Notebook, especially when combined with an automatic feed scanner, which you’ll frequently find on those ginormous copy/scan/fax machines at work.
Scanning Tip
Most scanners have a white surface behind whatever you’re scanning in order to reflect the maximum amount of light back to the scanning head. This is a problem when scanning something with writing on both sides because it can make the back side visible through the paper. To get around this, put a piece of black construction paper behind whatever you’re scanning. The light that passes through your paper won’t be reflected back to the scanning head. You can try scotch-taping the black paper to the top of your scanner but it may cause issues with automatic-feeds.
Notebook suggestions
If I was to recommend a traditional notebook I’d vote for the Rhodia Webnotebook in the A5 size with “Dot Grid” pages. A5 is roughly the same size as an 8 1/2" x 11" page folded in half. It’s small enough to carry around but big enough to fit decent sized sketches of your next brilliant ideas. A dot grid is what you’d get if you removed all the lines from grid paper but left a dot where each of the intersections used to be; a literal grid of dots. Grid paper feels like it simply has too much on it for me, and lined paper feels too restricted to writing. Dot grids provide a nice balance. The dots stay out of the way. Your paper isn’t covered with lines. Your writing stays relatively straight, and it’s easy to sketch things with the grid of dots to guide you.
If the dot grid doesn’t seem your style, I’d recommend picking up an A5 (“Large”) Blank Moleskine.
(Look closely to see the dot grid - CC Photo by retro traveler, on Flickr)
Rhodia’s Dot Grid notebooks are somewhat hard to find, but you can get one from JetPens along with some nice writing utensils and free shipping, or pick up a Large Blank Moleskine from Amazon. Moleskine has recently come out with the Evernote Smart Notebook (see the section on this above) which comes in a variety of sizes, in ruled and dot grid variants.
Another interesting option is the Boundless Notebook by Jim Whittle. It’s essentially a large piece of leather with a couple carefully placed slits that allow you to slide your own paper in. What’s cool about this, is that the more creative folks out there can pre-print your pages with whatever structure best suits your needs. Kind of like those pre-printed day-planners, only designed by you to meet your needs perfectly. The downside to this notebook is that you’ll need to find something to do with the pages once you’ve filled them and need to insert new ones. But, maybe that’s a good time to just photograph them or scan them in for backup.
And, of course, there’s the Traveler’s Notebook by Midori:
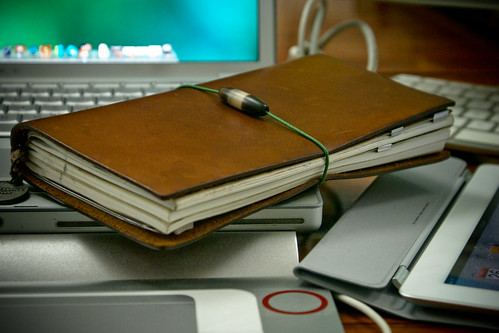
(CC photo by guccio@文房具社, on Flickr)
This gorgeous soft leather notebook comes in two sizes and has an almost cult-like following, and a good variety of accessories, but the large version’s unique sizing means you can only get refills specifically designed for it, and there are only a handful of vendors in the US. There’s a good review of the Traveler’s Notebook here.
I’ve fallen in love with my Traveler’s Notebook.
Choosing the right instrument
In my opinion, finding a good writing instrument greatly enhances and encourages the continued use of your notebook. It doesn’t matter what pen, or pencil, you use, and it certainly doesn’t have to be anything fancy or expensive. What matters is that you enjoy the one you’ve chosen. Maybe you choose your pens for the looks, maybe for the feel, or the way the ink flows. Whatever makes you happy.
For a while my go-to pen has been the OptiFlow Rollerball from Staples, because I love how smoothly it writes, and how much ink it flows onto the page, and they have them in the supply closet at work ;) But I’m starting to use the Pilot Double-Sided Brush Pen for writing and the Kuretake No. 13 Fountain Brush Pen for drawing. I love pens with thick confident lines. They remind me of the felt-tip pen my father always used to use.
If you’re just “meh” on your current tool, check out the Selection Guides at JetPens. Then buy yourself a sampler of pens that sound interesting to you, and give them all a go.
Interested in getting an Entrepreneur’s Notebook?.
If 150 people express an interest, in an Entrepreneur’s Notebook style refill (supporting the workflow described in part 2) I’ll make one. It would have a section laid out for your Table of contents, a dark line to go below the project name at the top of each page, and a circle in the lower outside corners for the page numbers, probably with a dot-grid body. They’d be designed as refills for the Midori’s Traveler’s Notebook, but could also be used as stand-alone notebooks.
Please, let me know you’re interested so that we can make this happen. ;)
References:
- Wall Street Journal - How Handwriting Boosts The Brain
- Lifehacker - Writing and Remembering: Why We Remember What We Write
- LifeHacker - Why You Learn More Effectively By Writing Than Typing
- About.com - How to Become a More Effective Learner
- About.com - Word on the Tip of Your Tongue? Study Suggests You’re Better Off Looking Up The Answer
- Positivity Blog - 7 Powerful Reasons Why You Should Write Things Down
- Recording Thoughts: One Notebook or Many?