The $11.09 iPad typing stand
The Problem
When you check out the iPad at an Apple store they’re all lined up on
little lucite stands with a grippy top and a slight angle so that
they’re simultaneously easy to view and easy to type on. I love those
stands. I’d totally buy one, but I can’t. [Update: now you can buy
something even better. Check out the
Loop from Griffin and
their A-Frame
the goal here was to create a stand that would hold your iPad securely, would let you easily read the screen, and type comfortably on. Also, it had to not look like crap, so duct tape was specifically excluded, and this is the result.

Now, some of you aren’t really the do-it-yourself type, and would like something a bit more “professional” looking on your desk. If that sounds like you, I’d recommend you check out thisvery slick $50 iPad stand from Griffin Technologies, that supports both typing and display positions.
What went into it
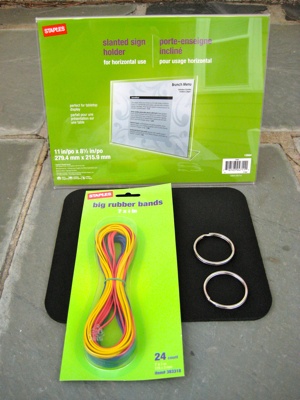
1 menu stand $8.99 1 package of 7 3/4" rubber bands $1.00 2 keyrings ( 1 3/4" ) $0.80 (each) 1 mousepad $0.00 (or $4.99 at Staples)
Putting it all together
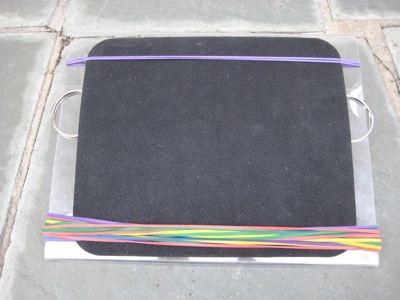
When you flip the stand over you’ll find it’s pretty floppy, but there’s a second layer of plastic folded underneath that could provide structural support, which is where the keyrings come in. The idea here is to sandwich the two layers of plastic together into one double-thick layer. You could use duct-tape but that’d be ugly. You could use super glue, but lucite tends to crack when you apply super-glue, or it did the last time I tried. I believe that duct-tape would also work quite well, but even colored duct tape would look a lot tackier, so we decided to go with keyrings. I suspect that large binder clips would work well too, just be sure to make the top flat with the top of the stand and take off the top arm of the clip after you clamp it on.
When putting on the keyrings make sure that the break in the ring faces outwards. There are two reasons for this: you want the full squeezing strength of the keyring to be covering as much of the plastic as possible, and the break will scratch the plastic if you try and pull it off (if it’s not already on the outside).
Next, the top rubber-band. Choose whatever color strikes your fancy and pull from the front to the back, then cross it in the back and go over the front again so that the unsightly x is in the back, then slide it up to the end near the bend.
Flip your mouse-pad over so that the fricative rubber bottom faces outwards and slide the top edge under the rubber band. It’s important to do this before you add the remaining rubber bands.
Next, take all the remaning rubber-bands and
stretch them wide before sliding over the bottom end. Be careful!
There’s a lot of force with all the rubber-bands and you can easily
pinch your fingers against the edge of the lucite if you’re not careful.
You won’t be able to cross them over, but that’s ok because you don’t
need to. You want a nice thick pile of them to provide a lip for the
bottom edge of your iPad to rest against. Congratulations, you’ve just
completed your iPad stand.

If you want to get fancy try stenciling on some eyes and a nose to go with those keyring ears, and rubber-band mouth.
