Task Order Up!
I’ve been a big fan of David Seah’s Productivity Tools for a while now, but when it comes to task management his needs, and mine frequently diverge. As a freelancer he needs to track hours in a way that is totally irrelevant to me. He’s got no-one to answer to but his clients, whereas I’ve got a boss and coworkers who are asking for details on current and past tasks in ways that clients rarely do.
I’d seen his Task Order Up! sheets a while ago, but they just didn’t work for me. Upon revisiting his site the other week I had a little brainstorm. They could be just about perfect for me with a few tweaks. Throw in a couple office supplies and I’ve got a useful task management and archive system.
Task Order Up (re-imagined) - PDF
Requirements
- must be able to show me exactly what I’m supposed to be working on now
- must help me easily recap what I did in the previous week for my status report.
- must help me out when the boss comes by and asks how I resolved that issue last week that I’ve entirely forgotten the details of.
- must help me know who I need to talk to about a specific task
The System
I’ll cover the changes I made to David’s sheets in a second, but first I’d like to cover the system that transforms this from a glorified notepad into an extremely functional tool.
Now, David’s original idea was to use these similarly to how a waitress would take your order, put it on a little pad, go to the back and stick that sheet on a restaurant order check rail. It’s a good idea, but having a whole bunch of visible tasks is too distracting for me. I want my To Do list to show me exactly what I should be working on right now and keep me from pondering about all the other stuff. Also, I needed some system to be able to look back into the near past to answer questions about what I had been working on. Chefs don’t care what they made 30 minutes ago, they just care about what they need to cook now, and what’s coming down the line.
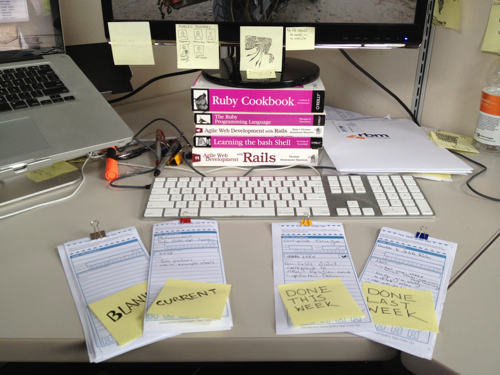
Four Stacks
In this system there are 4 stacks of Task Order Up! sheets:
- A stack of blanks (silver binder clip)
- A stack of tasks I’m currently assigned / working on (red binder clip)
- A stack of tasks that I finished this week (yellow binder clip)
- A stack of tasks that I finished last week (blue binder clip)
For the most part I don’t care about tasks that were completed at some point before last week, but for the odd occasion when someone does ask me about older tasks I take all the old ones and throw them into the “archive” which is actually just a larger black binder clip that lives on the back of the desk and holds the ever increasing stack. I could just as easily shove them in a drawer, but things in drawers may as well not exist to my brain.
The “current” stack (red binder clip) is prioritized, so the most pressing task is on the top, the next most pressing just below it, and so on. The completed stacks are prioritized by completion date (reverse chronological, like a blog) simply by virtue of the fact that new ones get added to the top.
Binder Clips
The color coded clips aren’t necessary, but I think they help. The clips keep the sheets together, should they accidentally get knocked, and the colors help me know which stack is which if they get moved around. This makes cleaning your desk much easier. Our office manager managed to find wee colored ones a little over a centimeter wide. If your office only has the larger binder clips you might want to go with colored paperclips instead. Most people don’t work on enough tasks in a week to exceed the holding capacity of a paperclip.
Flow
Tasks start on the left (with the stack of blanks) and proceed to the right as they pass through the stages (current, completed this week, completed last week). The archived ones from earlier weeks go somewhere out of the way.
Usage
New Task
- Grab a blank.
- Fill it out.
- Put in in the current (red binder clip) stack.

Completing a task
- Fill in the “Done” check-mark.
- Move it to the top of the “completed this week” stack (yellow binder clip).
- Start working on whatever’s on top of the “current” stack (red binder clip).
New Week
At the start of a new week your completed stacks are now a week too old and need to be shifted down the line.
- Grab all the tasks that were completed two weeks ago (blue binder clip) and move them to the archive.
- Grab all the tasks completed last week (yellow binder clip) and move them to the stack for tasks completed last week (the now empty blue binder clip).
- Your “completed this week” (yellow) binder clip will just sit there waiting for you until you finish something. So get cracking!
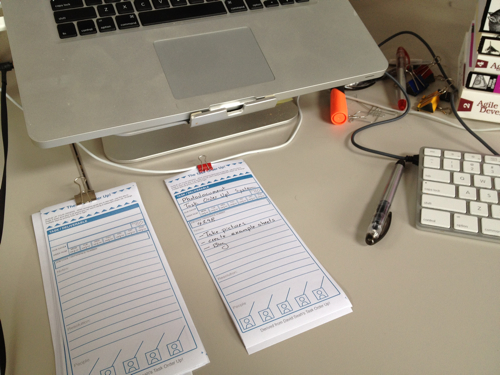
The Task Sheets
Now David’s Task Order Up! sheet’s are pretty great, and if you need to keep track of billable hours his are definitely a better choice. “The System” will work with either, but my variant doesn’t have any hour tracking.
Other Changes
People
Across the bottom of the sheet is a “People” section, with a bunch of icons. If you’re a freelancer you could use this to indicate what client the job was for. If you’re putting these sheets on a shared board to keep track of what’s being worked on you could indicate the person the task has been assigned to. In my case I use it to note which of my coworkers have knowledge of that section of our codebase… who I should go to when I have questions.
The icons are intentionally simplistic so that, in your bored moments (translation: meetings), you can doodle little hats, faces, glasses, moustaches, and anything else on them.
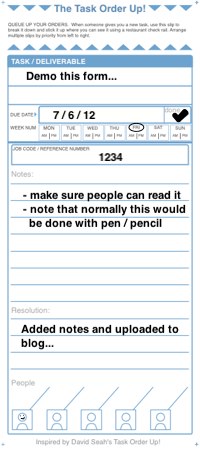
Notes & Resolution
I’ve replaced the “Steps that need to be accomplished” with a generic lined field for “Notes” and “Resolution”. Sometimes I need to write down steps, but more frequently I need to write down notes, like what user encountered a bug, and how to replicate it. The “Resolution” lines are where I note how the issue was addressed, because people keep asking me. However, the “Resolution” text is intentionally light enough that you could write right over it and it wouldn’t hamper readability.
Job Code
I’ve brought the Job Code / Reference Number block up because our team, like many others, uses a web-based ticket system, and I need to be able to easily associate the task with its identifier in the system, or vice-versa if someone asks me about ticket #4238.
Done Check
I’ve added a little checkmark to the right of the Due Date field, so that when you finish your task you can fill in the check and enjoy that satisfaction of a job well done… and give yourself a nice visual indicator of which tasks have been finished.
Features from David
When’s it due?
David’s provided a couple useful ways for tracking when a task is due. Use whichever one works best for you.
- The Due Date field is pretty much what you’d expect; a place to put the date the task is due.
- The Week Num: If this is a multi-week project you can write the week number it’s due in, and then circle the….
- Days of the Week: Circle the day of the week its due on, and AM or PM if it matters.
Due Date’s aren’t generally an issue for me. It’s ASAP for almost everything, but when there is a due date it’s generally in the same week and I’ll just circle the day of the week rather than trying to figure out what that date is.
Brainpower
David did all the heavy lifting here. My version wouldn’t be possible without his creative shoulders to stand on. Go to his site, check out his stuff.