Leaving Their Clouds
Intro
There are so many wonderful things about a “smart home” if you can afford it. There are so many tiny quality-of-life improvements that really add up. Being able to turn off the lights at night by talking to the air instead of having to walk naked from the switch to bed, and then climb under the sheets in the dark made us giddy for weeks.
The problem is that - for most people - the ownership of their smart home devices is an illusion. Google just killed the ability to control two generations of Nest thermostats from your phone. Phillips changed the terms of service such that you need to create an account, and agree to share you data with them. This change didn’t just affect new users. People who were using their lights without accounts, and without sharing data with Phillips were suddenly forced to go along with these changes if they wanted to keep using their very expensive lights.
Voice assistants were always a privacy concern, but the companies they were attached to at least pretended to not be immoral. Now, we’re seeing their true colors and there are significant reasons to be worried about always on listening devices, especially when living under authoritarian governments.
So, we set about reclaiming the control, and privacy, we should have had all along. We’ve almost entirely separated ourselves from the corporate clouds, but doing so was way more work, and learning than either of us anticipated.
This blog post exists in the hope that it can guide others through the process without so much frustration, and forced learning. It’s not a step-by-step guide to setting things up. There are plenty of those out there already. Instead, this is the collection of all the things that would have been helpful to know before embarking on this journey.
Why Bother?
-
Protecting Your Investment. Removes the potential for a company to make your devices unusable as a result of dropping support, changing behavior out from under you, not updating their phone app, or changing Terms of Service to something unacceptable
-
Controlling who can see your data. Stops companies from selling your personal data to law enforcement & random companies.
-
Removing yourself from the hacking targets. Unless you’re famous or politically powerful, Hackers are far more likely to go after a company server with millions of people’s records instead of hunting down one random individual’s setup. Hackers regularly break into large company’s data centers and steal potentially useful information. When you remove yourself from these systems you’re no longer a target.
-
No surprise updates. Companies push changes in behavior and functionality to smart devices all the time. You can update your devices still, but most of the time there’s no good reason to. You have a functional piece of hardware that’s no longer connected to servers you don’t control. Remote access and/or control from the manufacturer’s servers is no longer a thing you have to worry about, so there’s not a lot of reason to update and risk things changing or breaking.
-
Better control. Apple’s Home app is maddeningly dumbed down, and if you don’t like the way they present info, or allow you to interact with the devices there’s nothing you can do about it.
Home Assistant is not only much easer to interact with, it allows you to make custom dashboards of just the information you want.
-
Centralized control. Some apps do a great job of integrating with Apple Home. Some don’t even bother. Some, expose some controls and info but not all.
-
Complete control. With Home Assistant you have complete control over all of your devices in one place. If a device exposes some functionality, then Home Assistant will provide that in the UI. Each “Integration” is custom coded for the specific devices and / or protocols. It’s no longer a matter of hoping that the Home app from Apple, Google, or Amazon anticipated the needs and capabilities of whatever random device you’re connecting.
-
Better Automation Home Assistant provides a simple, and user friendly UI for creating scripts and automations.
-
Cost savings You’re going to save a ton on the devices you buy going forwards. An extreme example of this is the Air Exchanger we need to install to address CO₂ buildup in our house. An exchanger with decent efficacy and energy efficiency, runs around $3k, however the last time I checked, a smart one with decent controls was $10k. Worse, spending that money is a bet that the company would keep existing and supporting the cloud software it was talking to for the next 30 years. Most companies don’t last that long.
Instead, We’ll be buying the $3k exchanger, and installing some cheap (<$100 each) sensors around the house that will monitor the air quality and turn it on and off as needed.
Is it worth the effort?
We think so. We’re happier knowing that Phillips and other companies will no longer be selling our data. We’re happier knowing that none of our devices will randomly stop working because the company went out of business, or got bored and wandered off like Google did with the Nest thermostats.
We’re happy to be reducing our reliance on companies that have repeated proven they’ll compromise their morals, and treating their customers with basic human decency for cash, or political clout.
Apple has already removed apps from the App store that let people inform their neighbors when ICE is in the neighborhood, even though that’s completely legal in the US. Apple and Google have both broken their own encryption to give governments access to people’s messages in exchange for the ability to sell to their citizens.
On a more personal level, women and trans people are being increasingly targeted in the US, and both companies have done immoral things to help authoritarian governments. There’s nothing stopping Apple or Google from telling their listening devices to report in whenever someone mentions keywords like “Abortion”, or “Transgender”, or mentioning the name of any group the government decides in unsavory.
Home Assistant
The key to making this all work is Home Assistant. It’s a completely open-source replacement for the “Home” apps managed by Google, Apple, Amazon, or anyone else. It’ll also replace all 3rd party cloud integrations, like Phillips Hue’s.
The key thing you need to understand about a “Smart Home” is that your devices need some centralized “server” to talk to and be controlled by. Usually each brand talks to some “cloud” server owned by whoever made the device. If the company looses interest in maintaining that product, or goes out of business your devices will stop working. By redirecting those devices to a server you control, you regain a ton of control and privacy.
Because this is for your home, Home Assistant needs to run on a device that will always be on. You don’t want to loose access to your lights because someone closed the lid on their laptop.
While you can just use an old computer, most people tend to go with a Raspberry Pi comes in. For the non-geeks it’s just a teeny affordable computer that we can install Home Assistant on, stick in the basement, and forget about. Right now - November 2025 - the most expensive tricked-out version of the Pi (the Pi 5 with a whopping 16Gb of RAM) is ~$130 USD, plus a wee bit more for a power supply and a case to keep it safe.
Other options are the Home Assistant Green, and the Home Assistant Yellow. Seeed Studio has a blog post comparing the two. Ultimately, they’re not too different from the Pi. It’s just a teeny cheap, low-power computer that can act as the central hub for your smart home.
Future Proofing
Switching to Home Assistant isn’t locking you in to another ecosystem. Anyone can code up a competing piece of home automation software that you could switch to it at zero cost. If the core team of developers stops working on it, some geeks are guaranteed to fork the project and keep it going. It’s a technology agnostic central communications hub.
Required Cloud
If you want to communicate with your smart home devices when you’re away from home, you’ll need something that can bridge your internal network with the wider internet. Practically speaking this isn’t possible without involving a 3rd party.
The easiest, way is to use Nabu Casa. Nabu Casa is a company created by the people behind Home Assistant. It offers some basic cloud services - like backups, and accessing your local Home Assistant remotely, and they sell some useful hardware devices. Profits from it get funneled back into the Home Assistant project.
This is completely optional.
There is one glaring asterisks though, and it concerns Voice Assistants.
Voice Assistants
Dealing with the question of what to do about a voice assistant was the most intellectually, and emotionally draining part of this. Mostly, it’s because I was misled by the many, many videos on YouTube talking about how you can run an LLM powered voice assistant on your Raspberry Pi, and how easy it is to do.
These videos are all lies… kind-of. It is easy to do. It is possible. It’s also completely useless.
Here’s the thing. There are two types of voice assistants. The ones that are not powered by LLMs are an extremely limited set of hard-coded options that require very precise input, and have no memory. For example, unless you give every device in your home a unique name, you can’t say “turn off X” instead you have to say something like “Turn off Kay’s Stand Lamp in Kay’s office”. Everything has to be very specific and very specifically worded. If you thought Siri’s limitations were frustrating, this will drive you mad.
Then, there are ones powered by LLMs. This is what you want if you don’t want to be pulling out your hair and constantly complaining about how stupid your device is. This is what Apple promised with Siri, but never delivered. Not only can they figure out what you meant without precise wording, they retain context. For example. You could say “Are the lights on in Kay’s office?” and then, if it said “Yes” you could tell it to “turn them off” and it would know what you were talking about.
Even better, when you configure the LLM you set up a prompt that it will use to initiate all new conversations. That prompt can give it guidance on how to respond, and specific instructions to help it work around any frustrating edge cases that come up.
For example. We have a script called “Goodnight”. When I first said “Ok Nabu. Goodnight” The LLM thought I was just wishing it a good night. So, I added the following to its prompt.
Always check if there is a Script, Device, Area, or Scene that matches the user’s input and attempt to use that first. For example, if the only thing the user says is “Goodnight” and there is a script with that name, assume they want you to run the “Goodnight” script, and they’re not just wishing you a good night.
I could have just changed what words I used and said “run the goodnight script” and it would have figured it out, but we like laying in bed and just saying “goodnight” to our voice assistant and having it shut down our house.
Unfortunately there are two problems with LLM powered voice assistants. The first is that you need fast response times. Waiting twenty seconds (sometimes more) for it to turn on a light, is not practical. The second problem is that most people don’t understand just how unbelievably computationally expensive it is to process someone’s text and infer what should be done in response to that input.
Unless you’re willing to drop $7k or more on a beefy home computer with a nice GPU it’s just not a realistic option. So, you need to shuttle your info off to a cloud LLM provider. Trust me. I spent days trying to make it usable with the LLM running on a maxed-out MacBook Pro with an M1. For simple - very specific - requests the best I got was about 10 seconds between asking for something and having it done. More often it was twenty seconds or more. I didn’t even try on the Pi.
For the hardware geeks out there: No networking a bunch of computers to share the processing load is not an option. The latency induced by the machines talking to each other is so great that even adding a second device destroys response times.
The Voice Assistant Pipeline
At a high level you need four things:
- a device with a microphone
- something to convert speech to text
- an LLM to process that text and take action
- something to convert the text response from the LLM into a voice
The speech-to-text and text-to-speech can be run on the Pi. It adds roughly one to two seconds of delay to do so. These capabilities are handled by Whisper, and Piper respectively. These are both open source projects and trivial to set up on the Pi. But, I wouldn’t recommend bothering, unless you’re also going to drop a huge wad of cash on an in-home AI server.
Instead, I’d recommend doing what we’ve done and sign up to Nabu Casa’s Home Assistant cloud. In addition to giving us backups, and a way to access our Home Assistant from any device, they also handle the speech-to-text and text-to-speech. Currently this costs $6.50 a month or $65 a year.
Once Home Assistant Cloud converts our speech to text, that text gets handed of to an LLM cloud provider. We’ve gone with Open AI because it was easy, and it really doesn’t matter who you use. You don’t need the best model. You just need a relatively recent model that knows how to work with “tools” and is running on servers with enough power to respond quickly.
Instructions
- Setting up Speech to Text and Text-to-Speech with Home Assistant Cloud
- Configuring Open AI to do the thinking.
-
Gotchas
Homophones, and words that just sound really similar to other words are the biggest source of annoyances. During the speech-to-text processing words can get transcribed incorrectly. For example my office is called “Kay’s Office”, so I say things like “Turn on Kay’s office lights”. The problem is that “Kay’s” sounds a lot like “case”, and “keys”. It’s also indistinguishable from “K’s”. If it gets transcribed as “Case office” - for example - the voice assistant will fail to find an area with that name, and won’t be able to do what I asked. I’ve also found case-sensitivity to be an issue.
Home assistant allows you to specify aliases for devices. In order to figure out what the common mistakes are going to be, I recommend using the “Assist” feature in the Home Assistant app on your phone. It’s just like talking to a device on your counter, except that it shows you the words it thought you said. Try invoking something it has problems multiple times, and catch all the ways it screws it up.
Creating aliases works if you have an LLM or not, but I’ve found a better - and easier to manage - solution is to add something like this to your prompt.
If the user ever mentions a device or area name with “K’s”, or “case”, or “keys” in it, assume they meant “Kay’s”.
To deal with the case-sensitivity I added this.
When comparing the names of Devices, Areas, Scripts, Automations, and other things, always do so in a case-insensitive manner. For example, you should consider “Kay’s Lights” and “kAy’s lIGhtS” to be the same.
Privacy Concerns
Courts have subpoenaed data from essentially - if not literally - every cloud provider out there who has data from our smart devices. Alexa recordings have been used in at least one murder case, even though no-one was trying to invoke Alexa. So, why were there any recordings to begin with? Even if the systems deemed it an accidental invocation, why were those voice recordings saved?1
Home Assistant doesn’t have this problem. Unlike Siri, Alexa, and Google, there will never be an occasion where the device sends audio to the servers without you knowing, because you’re either pressing a button on your phone to make it listen, or you’re speaking to a puck on your counter, and that puck will always make a sound to let you know it’s been activated and is listening.
You can turn off the activation sound, but why would you? I hated that Siri sometimes tried to do something out of the blue, or all the times I thought it was listening as I tried to set a timer, but it was actually ignoring me and no timer got set.
Incidental Hilarity
Humans can carry on conversations with multiple people, and know which bits are intended for which listener. Voice assistants aren’t so smart. They just listen until there’s a long enough pause. In our house this has resulted in a number of accidental instructions to the voice assistant, when I invoke it while talking to Wifey.
Here’s the most recent example:
Me: OK Nabu, turn on Kay’s office lights. Wifey: Where’s the cat?
Voice Assistant: Ok. I’ve turned on Kay’s office lights. I’m not sure where the cat is. She might be somewhere cozy or hiding out of site. Let’s have a look around.
Something To listen
You’re going to need something similar to an Apple Home Pod, or Amazon Echo to sit around listening for commands. You can’t reprogram those to go to bypass their respective clouds and talk to your Home Assistant server instead. So, you’re going to need something new.

The Home Assistant Voice Preview
The easiest option is the Home Assistant Voice Preview. It costs about $60, and we’ve been pretty happy with ours. You’re not going to want to play music on it - although you can - but as a voice assistant device it completely out-classes the $700 Apple Home Pod, and it’s all because of that silly little ring of LEDs.
The first reason is that it makes it obvious that it’s actually working. When you invoke it the lights rotate clockwise. When it’s thinking it flashes. When it’s responding the lights rotate counterclockwise. You never have to wonder if your words have gone into a void and will never be responded to.
The second reason is that when you set a timer the ring lights up, and then gradually turns off sections. With just a glance you can easily know that there’s about ¼ of your timer left to go.
For the DIY geeks out there, it has a Grove port on the bottom so you can easily connect your home-made sensors.

The Atom Echo
Another option is the $13 Atom Echo. The speaker on this is tiny and sounds awful, and isn’t very loud, but the reviews are good, and if you just want a cheap device that’ll sit nearby, listen to you, and respond, this seems like a good choice. I’m thinking of getting one for my desk.
Unlike a microphone plugged into your computer, or Raspberry Pi, both of these devices have chips specifically dedicated to noticing when the Wake Word (“Ok Nabu” by default) is spoken.
Note about the Home Assistant Voice Preview
At the time of writing (November 2025) the setup has one really rocky step. You connect your phone to it as part of its setup, but then it gives you a poorly named text field where you need to enter the IP address of the device that it’s talking to. This means you’ll have to log into your router first to see what IP address gets assigned to the puck.
Talking To Your Phone
I can only speak to the situation on iOS, but I believe the same ideas apply to Android too.
Apple wants you to be locked into their ecosystem. As a result, there’s no way to replace Siri with any other voice assistant. There’s no way to have your phone always listening and have “Ok Nabu” work. Worse, when you tell iOS to stop listening all the time, multiple things stop working, or start being really buggy.
When I’m in the car it will no longer read text messages to me. It shows that they came in on the screen, but won’t automatically speak them. I assume this applies to headphones when I’m walking around too, but I haven’t tried that. More frustrating is that pushing the button to invoke Siri only seems to work about ¼ of the time. It’s not uncommon for me to have to press it 5 times before the little Siri listening animation appears, unless it’s connected to the car, in which case it always works.
Fortunately the Home Assistant phone app has enabled all the integrations, so there are lots of ways to create Shortcuts that can live on your main screens, or buttons that’ll live on the control panel.
Wake Words
There are multiple built-in options if you don’t like invoking the listening pucks with “Ok Nabu”, and if you’re geeky and willing to spend about ten minutes training a new one and loading it onto your device you can make anything into a custom wake words.
Radios
Most smart home devices aren’t plugged into ethernet, and don’t use WiFi, but you still need to be able to control them remotely. So, you need a radio transmitter that can speak the appropriate language on the appropriate frequencies to integrate with your devices.
The short short version is that you’ll need an antenna for whatever radio + digital protocol(s) your devices need, and you can’t reuse the same antenna for different protocols.
Protocols
Digital communication protocols are like languages. Radio protocols are more about radio frequencies and hardware.
If you prefer video over text, check out this video: Matter vs ZigBee vs WiFi vs Bluetooth vs Thread vs ZWave - Which is the BEST Smart Home Network?
WiFi
The same thing your laptop uses to talk to the internet. Wifi devices will probably talk to your existing network. The problem with WiFi is that it’s really power hungry and will drain batteries way faster than any of the alternatives. Don’t use WiFi devices unless they’re always plugged in.
Zigbee & Zigbee2MQTT
Zigbee - sometimes noted as ZHA - is a digital communication protocol, and a radio communication protocol. Zigbee2MQTT - usually just noted as Z2MQTT.
To understand the high-level difference between the two I recommend watching Zigbee2MQTT vs ZHA (Zigbee Home Automation) - Which should you use for your Smart Home? The basic summary is that Z2MQTT is slightly more powerful, but not in a way that most people will care about, and beginners should really just use ZHA.
What’s cool about Zigbee is that it’s low power, and creates a mesh network. All the devices that are constantly plugged in like light bulbs and power outlets act as relays to devices that need to be extremely conservative about their power usage, like battery powered air quality monitors.
Also, there’s a wonderful directory of Zigbee Compatible Devices that’ll help you find things you know will work.
The most important thing to know is that Zigbee (ZHA) is what most Hue light bulbs use. So, if you’ve already got a bunch of Hue bulbs, this is what you want.
Note that sometimes adding a ZHA device can take longer than you would expect. They’ve very responsive once added, but finding them on the network the first time can take up to a minute.
Matter
Matter has been getting hyped by Apple and Google, but it’s only a digital communication protocol. It can - theoretically - be run over any radio protocol. But in practice it can work over the Thread radio protocol or Wi-Fi.
If you choose to try and integrate with Matter devices you’ll need to make sure those devices have Thread radios in them, and that you have an antenna that can speak Thread.
Z-Wave
Z-Wave is another radio + communication protocol that works over a mesh network. It’s not as energy efficient as Zigbee, but it’s a decent option.
Bluetooth
Bluetooth is terrible for smart home devices. It works, but unless you live in a shoebox, you’re going to have issues with range. Bluetooth devices also have a tendency to only work with an app made by the manufacturer. As soon as they stop maintaining that app, or the servers it uses, your device becomes useless.
For example, we have Aranet CO2 sensors. They use Bluetooth. Home Assistant has an integration for them that works great, but unless it’s a few feet away from the Pi our Home Assistant is running on, they may as well not exist. Even our phones can’t see all of them at once.
Hardware
If you have Zigbee - ZHA or Z2MQTT - devices I recommend the SONOFF Zigbee 3.0 USB Dongle Plus Gateway (~$40). You’ll also want to get a USB extension cable so that you can physically separate it from what it’s plugged into, and other devices in order to minimize radio interference. My understanding is that it can only do ZHA or Z2MQTTT, but not both.
If you have Z-Wave or Thread devices I recommend the Home Assistant Connect ZWA-2 antenna (~$70). Note, it can be configured to speak Z-Wave or Thread, but not both. If you have both types of devices you can use two antennas.
Once you plug these in to your Home Assistant computer they’ll show up in the Devices and Integrations screen automatically. They’re both trivial to add in, and add devices to.
We have a Zigbee ZHA antenna because we already had a bunch of Hue lights, and a Z-Wave antenna to talk to our new thermostats.
Lights
Most of you will have smart lights. You’ll likely have Hue lights too. This makes the decision of what radio & communication protocol to use pretty easy. You want Zigbee ZHA.
The vast majority of Hue bulbs speak ZHA already. All you have to do is delete them from your Hue app, and they’ll automatically go into pairing mode. Then add them to the Zigbee integration in Home Assistant. The only Hue lights we had that weren’t findable by new Home Assistant setup were some white-only ones. Check the database if you’re wondering if yours are supported.
Once you’ve separated yourself from the Phillips Hue cloud - or any equivalent system - things suddenly get much cheaper. For example, I just bought 4 full color light bulbs from Third Reality for $30. A three-pack from Hue costs $100.
Smart Switches
You can make a room’s “dumb” lights “smart” by replacing the wall switch with a “Smart” switch. This is significantly better than something like a Hue switch, because it’s not reliant on the software. It works as a regular switch even if your Home Assistant server is down.
I love this, but there’s another way to achieve the same result. Instead of replacing the switch you can easily wire in a small smart control unit in the wall behind it.
Smart Home Device Shopping Gotchas
Now that you’re freed from needing to use a particular manufacturer’s device, you’ll have a lot more options. However, you need to be careful about the protocol. In my experience most of the manufacturers spam keywords on Amazon. For example, search for “Zigbee lights” and you’ll get a bunch of lights that don’t speak Zigbee, but instead work with Apple HomeKit, Google Home, Matter, or whatever.
Be sure that whatever you’re about to buy specifically states that it’ll work with whatever radio setup you have, and remember that Zigbee ZHA and Zigbee2MQTT are different things. Look for “Home Assistant” in the reviews too. It’s always a good sign when you find it.
The other thing to watch out for is no-name fly-by-night Chinese resellers. When buying Zigbee compatible products for example, you’ll spend a little more for a brand name like Sonoff or Innr, but these are companies that are trying to build a name for themselves and make quality products. Read people’s reviews.
Automating Things
Home assistant has a concept of “Automations” and “Scripts”. The distinction wasn’t obvious to me at first, but it’s ultimately quite simple. An “Automation” is a collection of instructions that’s triggered by some event (time, sensor reading, whatever). A “Script” is a collection of instructions that’s triggered by you (pushing a button on your phone, voice control, whatever).
Here’s our “Evening Vibes” Automation. Sunset triggers the closing of the shades in our bedroom and living room, and turns on the living room lights. Note that window shades / blinds are referred to as “Covers” in Home Assistant.
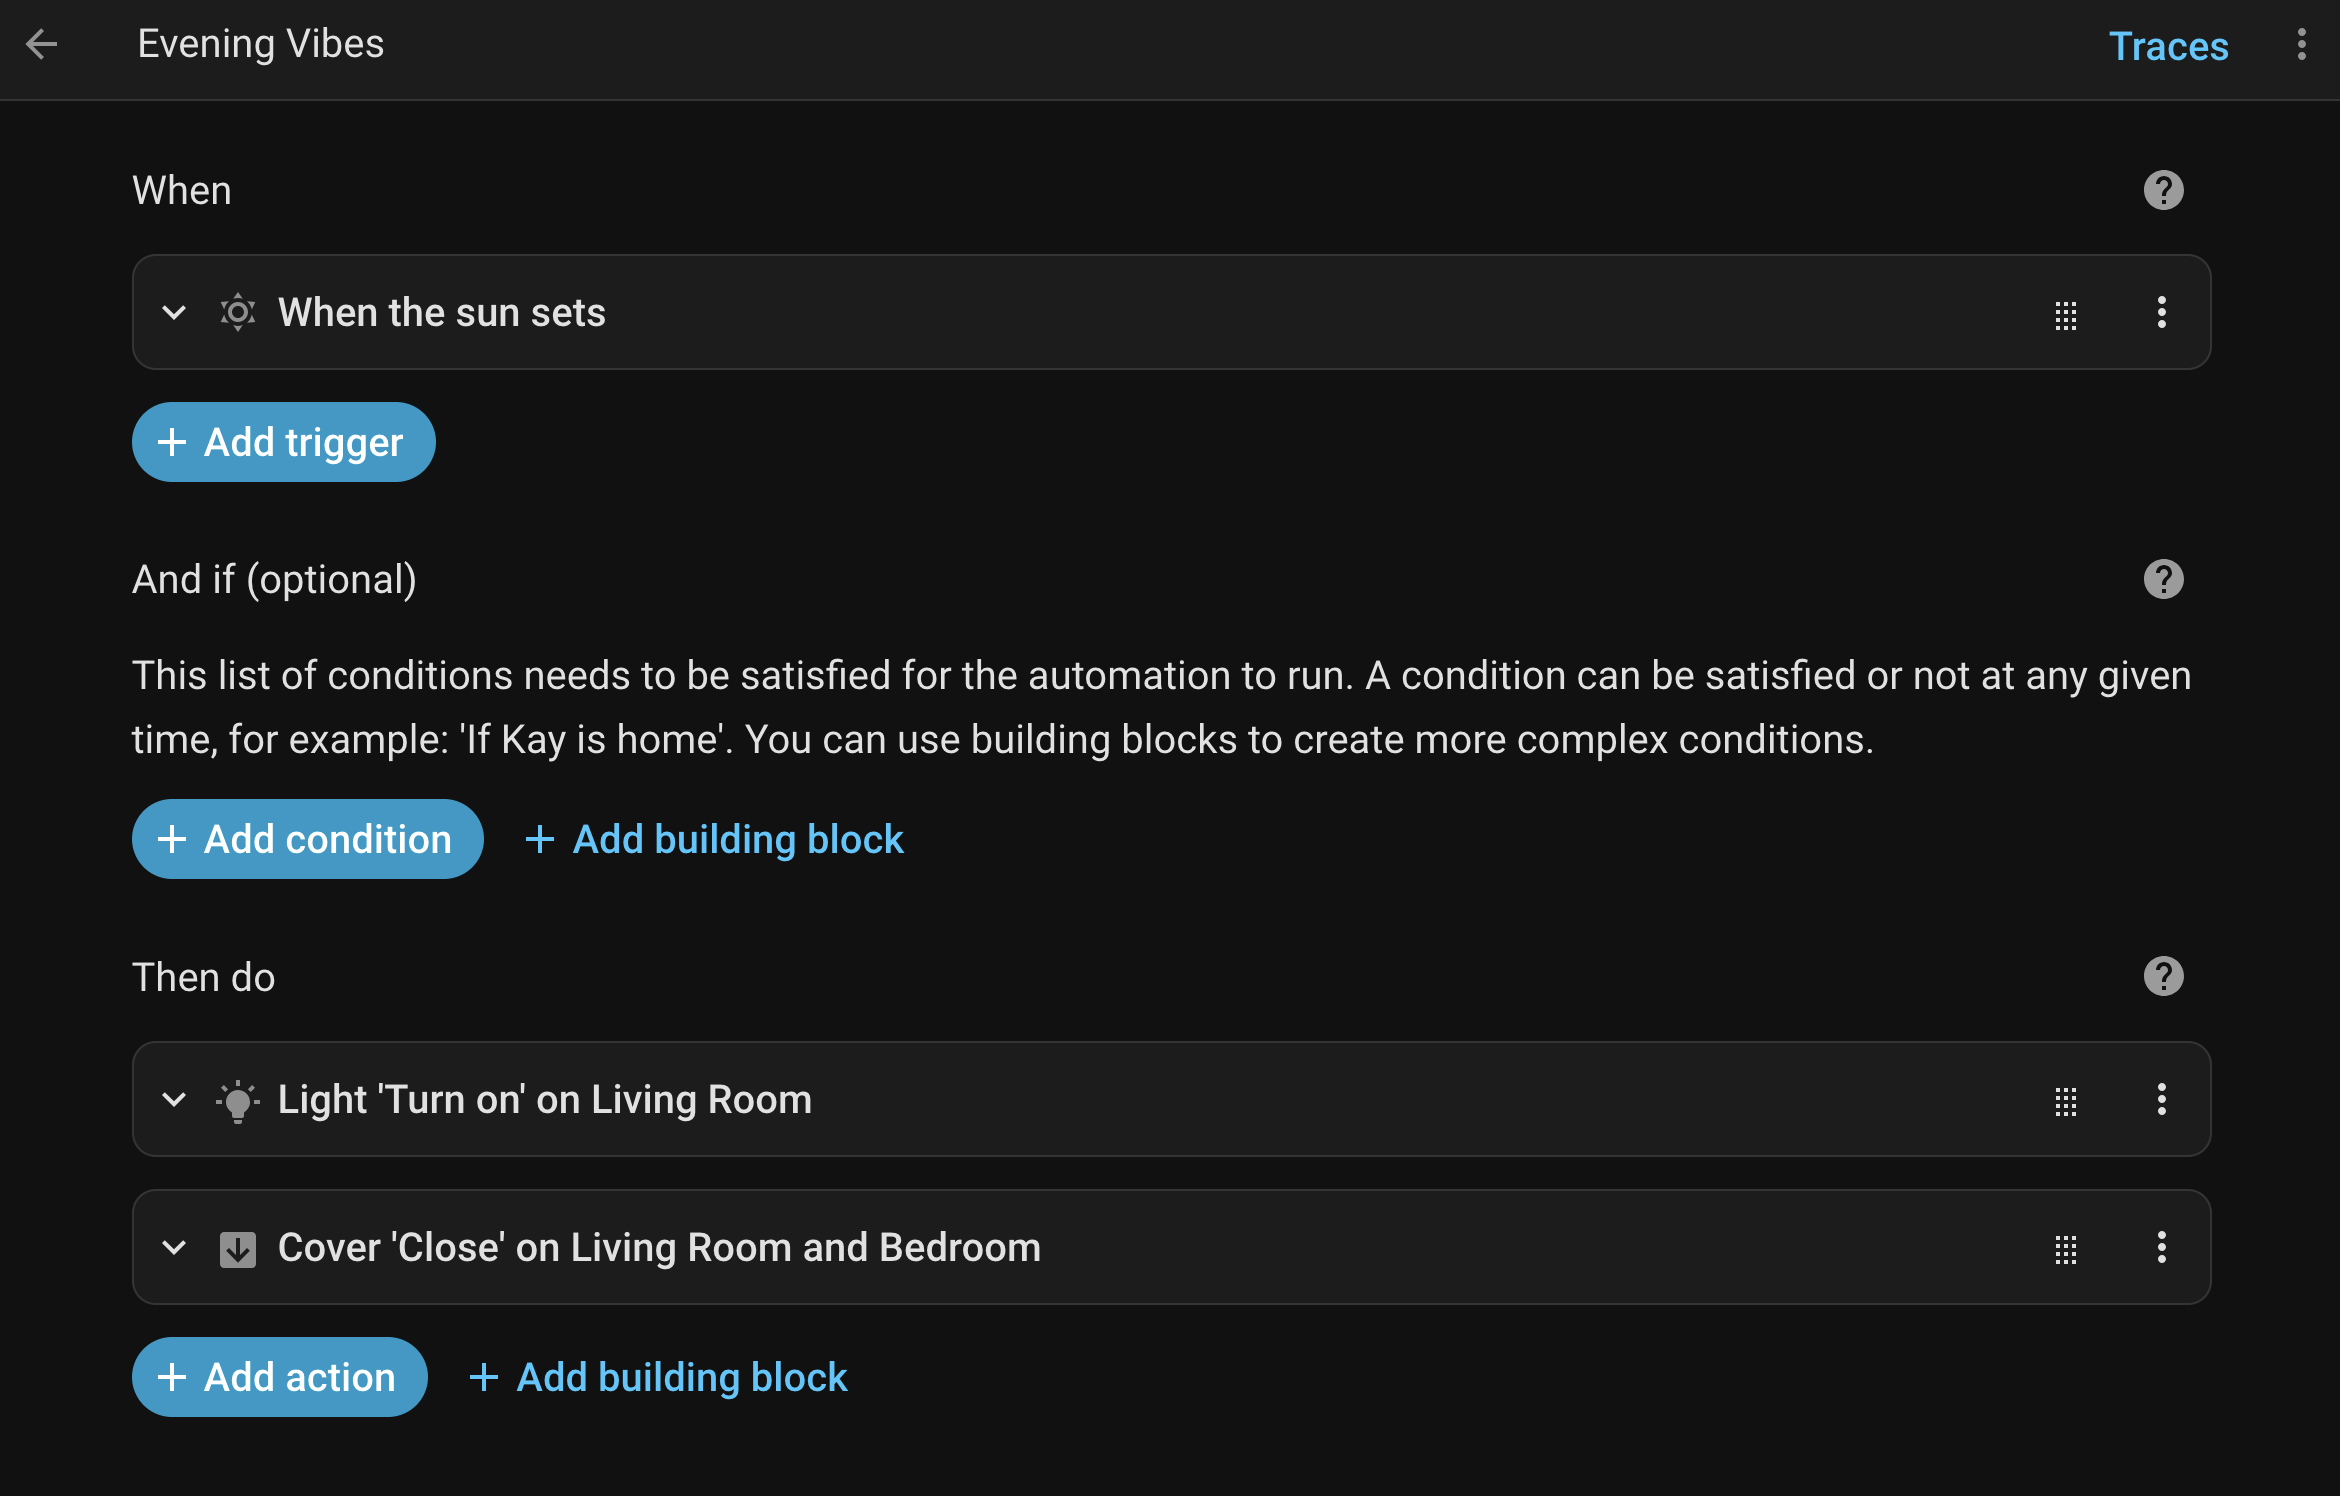
Automation Example
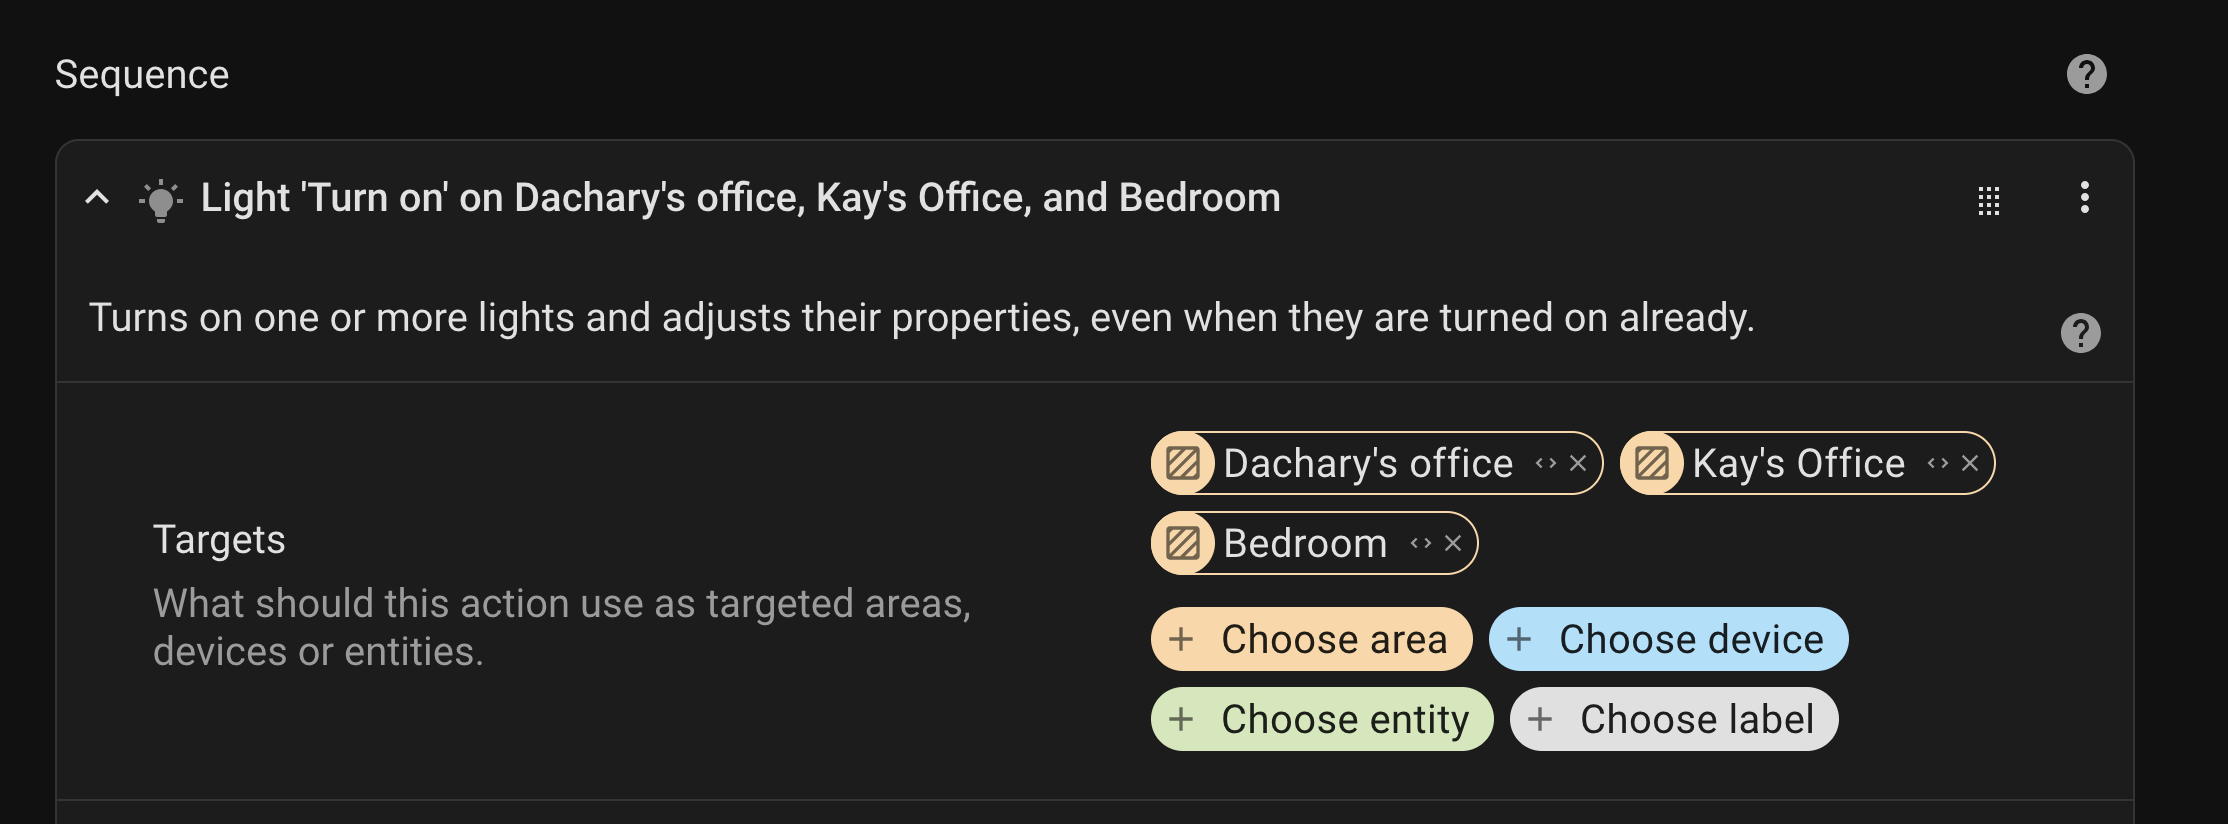
Here’s our “Ready For Bed” Script. When we say, “Ok Nabu. Ready for bed.” it’ll turn on the lights in our offices, and the bedroom. Both of us have reason to make a stop in our offices before going to bed, and it also helps us to see the way to the stairs.
Note that we haven’t specified which lights. We’ve just instructed it to turn on the lights in an Area. If we add or remove lights from that area the script will do the right thing.
Script Example
There are also Blueprints and Scenes. According to Home Assistant, “Blueprints are reusable automations and scripts that can be easily shared.” while “Scenes capture entities’ states, so you can re-experience the same scene later on. For example, a ‘Watching TV’ scene that dims the living room lights, sets a warm white color and turns on the TV.”
Cost
Note: We already had a Raspberry Pi with Home Assistant on it. A new top-of-the-line Pi 5 would be $130, + $15 for MicroSD cards, + another $30 or so for a case and plug.
Replaced Things
-
Zigbee antenna to replace need for Hue hub & our connection to Phillips servers.
-
4 Hue lights weren’t Zigbee compatible. $30 for a four pack.
-
Wall plugs We had Meross plugs but one of them started acting up, and the Meross integration isn’t officially supported, and, and, and… it was just easier to replace them. $35 2 pack from Innr
-
Open AI less than 1¢ USD per day.
-
Nabu Casa Subscription $6.50 per month, or $65 per year. There’s a free trial to make sure it does what you want.
This isn’t technically required, but it was a good solution for giving us remote access, and offsite backups. Also, it supports the ongoing development of Home Assistant.
-
Listening Devices We had one Home Pod that we replaced with Home Assistant Voice Preview Edition for $60. However, because our phones can no longer act as always on listening devices, we added two additional “pucks”. One in the living room, and one in the bedroom, for a total of $180.
-
Yale WiFi adapter When we bought our Yale lock it had a Apple Home Kit module in it. That only talks to Home Kit, but we were able to swap in a $62 WiFi module. This isn’t great, because Yale is a complete shit-show when it comes to their management of smart devices, we’re still tied to their cloud, and the company has been sold twice since we bought the lock.
Grand Total for replacement hardware: $359 + subscriptions to Open AI and Nabu Casa.
New Things
-
Z-Wave Antenna $70 Home Assistant Connect ZWA-2
-
Z-Wave Thermostats 4 Honeywell T6 Pro Z-Wave Thermostats @ ~$170 each. ⚠ This is a discontinued product. I didn’t really care because it had good reviews, thermostats get discontinued all the time, and we have no need of their support and / or servers because it’s entirely locally controlled.
-
4 new lights for the fan in my office $41 four pack of Zigbee lights from a brand I’d never heard of.
-
DIY CO₂ sensors Combining an ESP32-C6 board ($6) from Seeed Studio that can speak Zigbee ZHA with an SCD-41 CO₂ sensor from Adafruit ($50) plus some wires to connect them ($15 for a spool set that’ll probably take years to use up), and a 3D printed enclosure.
~$57 per sensor
Just requires soldering 4 wires, flashing the ESP32-C6 board - just plug it in and visit a web page - and sticking it in an enclosure.
Pre-built alternatives range from $200-$300 each.
Note: we didn’t actually need the Z-Wave antenna. There are Zigbee thermostats, but life conspired such that we ended up with the antenna and decided to use it instead of returning it.
Total cost of new additions: $962, but $680 of that was the thermostats.
What that bought us: control over our thermostats + the ability to automate them & see what the temperature is in the various heating zones of our house, better lighting in one room, and addressing one of the prerequisites to getting an Air Exchanger so that we stop having to open windows in the middle of the winter.
-
As a developer I understand that companies store recordings of accidental and intentional activations for training purposes. Apple claimed everything was anonymous, but leaks revealed that wasn’t true. Since then Apple has been going out of its way to help the US government’s authoritarian plans. There is no reason to believe they won’t give them access to recordings of anyone the government is interested in. ↩︎